I decided to migrate this blog to Melev's ReefAddict site. I like the site, like the format and proposal they have, and like the founder's "will help" attitude.
The link to future posts is:
http://www.reefaddicts.com/blog.php/1596-snorkeler
See you there!
Snorkeler (Fabio Paoli)
Wednesday, December 8, 2010
My happy Palithoa
Here is a picture of my Palithoa, showing what I mean. It is happy, but the Valonias are everywhere, on the rock below it and on the rock it is attached to. Notice how the tentacles of the left hand side polyps are extended. Even when the tank was new and the Palithoa had just been implanted it never extended tentacles so wide and open like that.

Water quality must be improving.
Snorkeler

Water quality must be improving.
Snorkeler
Tuesday, December 7, 2010
Discouraging and encouraging
It is interesting to note how maintaining a marine aquarium sometimes is a roller coaster of emotions.
Discouraging:
Right now it is quite discouraging to see the plague proportions my Valonias have reached. Shortly after the Valonia eating crab died I spent 5 days away from home (birth of a child, praise the Lord) and left my auto-feeder on. I think it auto-fed too much, as mu green hair algae grew a lot, an so did the Valonias. There is a FOWLR acronym in reef keeping, meaning Fish Only With Love Rock. Not my case, as I have a few corals, but assuming it were my tank right now is looking more like FOWLV, Fish Only With Live Valonias. They are really everywhere.
I intend to do some major cleanup of the rocks, maybe in a month's time, maybe earlier, taking each rock out and scrubbing the Valonias out of them. I'm also going to study Valonias and Green Hair Algae more, ordered a book on Algae which I hope will help me design future steps. Probably they'll involve getting livestock that eats Valonias, and, installing an Ultra-Violet Sterilizer to gradually kill the spores that Valonias release, reducing their success rates.
Encouraging:
My corals seems a lot happier recently.... yes, the Zoanthus colony and the Palithoa colony are wide open now. Specially the Palithoa was a surprise, as it had been shrunk and only shyly open for the last months. But in November it started opening again, extending it's border tentacles, I am so happy with that. Why? Well, it means I'm getting the water quality under control again! What was the main reason, IMHO? Less feeding, definitely. The fish might be going a little hungry right now, but I'm sure there is less stuff left in the water which means less nutrients. Second main reason probably is better controlled Alkalinity and Calcium. Aside from two 40L water changes in the recent weeks (done to cleanup green hair algae) I've been using Purple Up, a suggestion from my LFS. It is simple to administer and helps to ensure Ca, Iodine and other elements don't go too low.
So, it is a roller coaster sometimes. But one can not give up. Even people who later became Tank Of The Month at ReefCentral had plague proportion Valonia invasions (seapug did, read this post, and a few years later his tank was TOTM). It is possible to revert the situation, without going crazy. I think with careful study and further steps I'll win this battle, Lord willing.
As many people will tell you online, patience is an important, if not the most important, attitude for successful long term reef keeping. Lots of study and careful planning come next, I guess.
Snorkeler
Wednesday, November 24, 2010
Mithrax crab died...

But the corals look happy, the Zoanthus, Palithoas and Hammer corals are expanded and looking very healthy... so it is hard to believe in water quality issues...
Published with Blogger-droid v1.6.3
Sunday, November 7, 2010
No more siphons: SW mixing containter now has a faucet
Yesterday we got busy eliminating the "last reason" to use siphons during water changes: our new saltwater mixing container didn't have a faucet. Now it does!
Thew whole point of this is with a faucet I can fill up my plastic jerricans by just opening the faucet.... no hoses, no siphons. No spilling water on the floor, no running freshwater in the hose to clean it afterwards. Less of a mess, quicker turn around time.
I drilled a hole into the Rubbermaid container we use to mix water and installed a simple PVC faucet. Here is my kid testing it (we filled the container to the top to see if it leaked):

And here is it in the "saltwater mixing room":

Maybe I'm a little bit paranoid with efficiency, of getting things done in the quickest way possible. :-) But I like it.
Snorkeler
Thew whole point of this is with a faucet I can fill up my plastic jerricans by just opening the faucet.... no hoses, no siphons. No spilling water on the floor, no running freshwater in the hose to clean it afterwards. Less of a mess, quicker turn around time.
I drilled a hole into the Rubbermaid container we use to mix water and installed a simple PVC faucet. Here is my kid testing it (we filled the container to the top to see if it leaked):
And here is it in the "saltwater mixing room":
Maybe I'm a little bit paranoid with efficiency, of getting things done in the quickest way possible. :-) But I like it.
Snorkeler
Saturday, November 6, 2010
LED lighting fixture:new milestone
Time to share a little more of my progress constructing a LED light fixture.
Last weekend I completed an important milestone, I prototyped the circuit +power source that would drive the LEDs (turn them on of off) with dimming capability. The power source is a simple PC ATX power unit, a used one in fact. The driver circuit is a simple MOSFET Transistor switch with a current limiting resistor, and a fuse to protect against over current in case a LED blows.
The dimming is done using an Arduino controller. Never heard of Arduino? They are a lot of fun, if you like to play with robotics or other types of programmable toys. Check out: http://arduino.cc . One day when my kid is a little bit older I hope to build small Arduino controlled robot car or boat with him.
Enough talking, here is a video of the prototype working:
It is dimming the LEDs up and down very fast just for testing. Obviously the final Arduino program will dim very slowly to simulate sunrise then sunset.
Nice huh? It is great to reach a milestone like this one when things work. It wasn't all rosy all the time, though. I spent almost an hour figuring out why the circuit wasn't working, and in the end I had forgot to make one connection. Once fixed, it came to life!
I was only able to build this driver circuit thanks to the help of kcress from ReefCentral, as registered in this thread:
http://www.reefcentral.com/forums/showthread.php?t=1914090 . ReefCentral is a great place where you find lots of helpful people from all walks of life. If you have a saltwater aquarium you MUST have an account there and participate in the forums.
Snorkeler
Saturday, October 30, 2010
Water parameters unmoved
I'm a little puzzled... after more than a week of daily dosing Mg and a few doses of Ca (separated by 12h) there has been no move in concentrations... Ca still at 350ppm and Mg still at 875ppm.
I've seen some whiteish powder-like deposit in the sump, maybe the Mg has not dissolved but rather precipitated in association with something else?
Anyway, I just mixed new SW, will measure it's Ca and Mg tomorrow to see if it's at least close to Ca 420ppm and Mg 1280ppm.
I've seen some whiteish powder-like deposit in the sump, maybe the Mg has not dissolved but rather precipitated in association with something else?
Anyway, I just mixed new SW, will measure it's Ca and Mg tomorrow to see if it's at least close to Ca 420ppm and Mg 1280ppm.
Published with Blogger-droid v1.6.3
Sunday, October 24, 2010
LED lighting fixture being built

For now check out the fixture that will hold my lights. Yesterday it was my nephew's birthday and my sister in law did an arts & crafts activity during the party. Well, I decided I could do some grown up arts & crafts (also known as DIY) while the kids would do theirs.
Here is the result.
Published with Blogger-droid v1.6.3
Wednesday, October 20, 2010
stabilizing water...
Today we had our men's accountability group meeting at my place, and my friend Ellery gave a wonderful summary of my tank: "totally out of control, huh?". :-) It's good to have male friends isn't it? :-D They always tell you the truth! ;-)
Anyway, he is 100% right, the abundance of hair algae plus valonias makes it very clear this tank is still a work in progress.
I discovered recently that my water's mineral properties were a little off.... and part of it due to my newly mixed seawater being somewhat low in Ca, Alk and Mg. On 9/Oct I had these parameters in the tank water:
- Alk=5.6dKH, low
- Ca=350ppm, low
- Mg=875ppm, very low
So I started dosing Ca and Alk buffers and this week also Mg buffer following advice by Sk8r from ReefCentral regarding the importance of Mg. My past experience is that Mg is the hardest to raise.
Right now my parameters are (just measured):
- Alk=12.3dKH, high
- Ca=350, low
- Mg=875, very low
I'm not sure why Ca didn't raise but I suspect it's because Mg is too low. So I'll focus on adding Mg buffer for a while and re-measure the three in a few days.
I'm also considering adding a little Mg and Ca buffer to my new SW used in the water changer...
Snorkeler
Published with Blogger-droid v1.6.3
Monday, October 11, 2010
New Shrimp take 2

The new shrimp we got a few weeks ago died after a week in the tank. Water parameters were OK so we suspect he was already weak at the LFS.
Went to the LFS today to buy Calcium buffer and the LFS guys were nice to us and gave us a replacement shrimp as courtesy. Points for them! (http://www.solarreefs.com.br) I really like that LFS and in situations like these you see they care for their customers.
Published with Blogger-droid v1.6.2
Sunday, October 3, 2010
Jerrican+Dosing Pump Auto Water Change Implemented

After the partial water change finished I implemented an automatic 'continuous' water change with my dosing pumps (the BFG9000, remember?) and a pair of plastic jerricans.
In the picture, from left to right:
- Jerrican into which I pump old SW removed everytime the pumps turn on. That happens every 30 minutes, pump on for 1 minute, removing 54ml. Equates to a daily 1% water change.
- Small green bottle with Vodka, which is dosed at 1ml every 12 hours.
- Jerrican from which the pump pulls new SW and sends it to the tank. 1 min every 30 min (54 ml).
- Freshwater (RO/DI) auto top off jerrican, this one activated by water level sensors and with a dedicated little pump in the jerrican.
I measured the water before the changes and basic params were good: pH=8.4, NO3=1.25ppm, PO4=0.1ppm and salinity=1.025.
I didn't measure Alk or Mg for I was only looking for water polution. Also, I intend to start checking tomorrow the Alk and Mg consumption of the tank with the continuous water change. Then I'll dose manually to compensate and afterwards setup the last dosing pump to supply automatically whatever is most consumed daily.
Published with Blogger-droid v1.6.2
Saturday, October 2, 2010
Finished the woodworking, TLZ11 in

Published with Blogger-droid v1.6.1
Installing new temperature controller

Got my chisels out, it has probably been some 4 years since I last used them... it's good to have the right tools for the job :-) .
Published with Blogger-droid v1.6.1
Saturday, September 25, 2010
New shrimp in

Published with Blogger-droid v1.6.0
Sunday, September 19, 2010
It arrived....

Published with Blogger-droid v1.5.9
Thursday, September 16, 2010


Tuesday, September 7, 2010
New Sump, with Refugium
I just took vacations, and I used some of those days to do my tank's yearly maintenance plus upgrade the sump and install my new side cabinet where my new ATO, water change and special equipment would be housed.
Here's the story, with pictures. If took about 3 days, the first day was veeeery long, on the other two I spent just a few hours in each.
Some background first....
I like very much the LFS where I bought my tank, Solar Reefs (I'll call them LFS1 from now on), I think the owner and his assistant are very knowledgeable in marine aquarium biology, fish keeping, coral keeping, products and they have a natural/biological approach to husbandry trying to avoid too much equipment and gizmos. I definitely like that. In general I always trust their advice and I buy fish and corals only from them because their stuff is properly quarantined. Their store tanks are beautiful and you can sense their care with the livestock when you are there.
But, they are not engineers, and that gradually became evident in the ventilation and noise design flaws of my tank. In terms of noise they used fans that vibrated too much, and the cabinet transmits too much vibration to the floor (bothering my neighbor below until I changed fans and skimmer pump impeller). As time passed I discovered the hood and the sump cabinet didn't have good ventilation. On the hood there were two fans designed to come on when temperature went above 27.5C, but, there were only two holes in the hood, each with a fan and both fans pulled air into the hood. The result, weak cooling. I had to fix that in January 2010, removing one of the fans and installing a silent computer cooler fan on top of the hole where the other fan was. So one hole is where air is pushed in by the cooler, eventually distributed inside by one of the old fans, and the other hole is empty so the hot air can escape through there. In the sump cabinet there was another fan that in theory pushed air to the outside of the cabinet. The problems there was that it was noisy and that it was always pulling moist air(it was inside the sump cabinet, after all), so salt gradually built up on its blades and body. I designed the new cabinet and ventilation to fix that, as you'll see in the pictures.
I decided to test a second LFS for the new sump construction and delivery (I'll call them LFS2, they are Onda Aquários), they are much closer to my house than LFS1, have a good reputation too specially with Mathias a Brazilian aquarist I admire, but they don't seem as knowledgeable as LFS1. For sump construction, fine, but for fish, coral, livestock and food purchases I'll stick with LFS2 as I'm quite sure they are better.
End of the (long) introduction. Here come the pictures.
Story starts with the carpenters (LD Marcenaria, high quality, I definitely recommend them) delivering the new side cabinet. Here is a full tank shot of the original tank with the new cabinet positioned close to final installation location:

Here is another view of it open:

As you can see inside it I can house about three 22L plastic jerricans on the bottom plus other 10L jerricans on top or other bottles and stuff.
Here is the old sump before disassembly. This picture was taken at 14:00 and when I started disassembling the stuff the new sump hadn't arrived yet. It was promised for 17:30, so there was enough time.

It was quite dirty inside.... never cleaned in a year....
So I drained the sump's water, removed all the equipment from the sump and placed them in a box with old saltwater:

Here is the old sump drained and empty of equipment and plumbing. This was 18:30 and LFS2 had not delivered the new sump yet. Not good....

More stuff removed from the old sump:

And here are two pictures of the fan (a computer cooler, as I removed the original fan in January because it was too noisy) that was inside the cabinet. Notice the salt plus debris buildup on it... an ugly grey thing I'll call "dustsalt"...


LFS2 called around 18:45 telling me the new sump would be delivered around 20:00... ok, delayed but not forgotten.
But, at 20:30 no sign of the new sump.... and as I called LFS2 nobody answered (they closed at 20:00). Then I got worried.... I knew I wouldn't be in too much trouble if I had to spend the night sump-less because of my MP10 pump in the display tank which would keep the water moving and oxygenated. But, it wasn't a very comfortable situation...
At 21:15 roughly the sump arrived, but it was being delivered by two aquarists who "were doing a favor to Onda"... seems like they just happened to pass at the store and were recruited to deliver the sump. Not good. When I bought it it was very clear that they would deliver the sump to me. Yep, LFS2 didn't pass the customer service or reliability test... what if these guys had damaged the sump during transportation? Will only use them for stuff I'm in haste of getting, due to their greater proximity to my house.
Here is the new sump, being tested with freshwater for leaks. No leaks, sump OK, ready to start installation. This was around 22:00:

Here is a picture of the new hole on the sump cabinet side, where the new ventilation fan is going to be installed. I "painted" it with silicone to avoid moisture problems in the cabinet walls. This new fan will blow air into the sump cabinet, drawing it from the side cabinet where air is still dry. Therefore there should be no "dustsalt" buildup on it, only maybe dust buildup.

And here is the Ching-Ling cooler fan I use. I chose it because it is silent, really silent, with good air flow (12cm diameter). The only inconvenience is that it's 12V DCC.

Here is a picture of the sump cabinet empty and clean. It was quite dirty with "dustsalt" and just salt inside. It was 23:00 when I took this picture.

A view of the sump cabinet ceiling, where the plumbing that communicates to the tank is. The central tube is the main tube connecting the central overflow box to the sump (it is how water comes down from the display tank to the sump). The tube with a small horizontal piece is the second tube that comes from the overflow box, there are two to avoid problems with accidental clogging. The other two smaller tubes to the left and right are the return tubes, through them we pump water from the sump back into the display tank. I have two of them (and two pumps) for safety reasons too, so if one breaks down the other keeps the water flowing between display tank and sump. One of the return pumps is connected to a UPS/No-break power source (saved me when we had a 5 hour blackout earlier in the year).

Finally the new sump being moved into position to be inserted into the cabinet, on my home made dolly:

Then, the new sump in the cabinet. It looks like the old one, but it is 10cm deeper and the right compartment is a refugium, not the ATO freshwater reservoir as in the old sump:

It was 23:20 when the picture above was taken. Now I still had to clean the pumps and plumbing and re-install it all back into the new sump, bring new saltwater and get the tank operational again. I was expecting to be in that situation around midnight. It was 40 to midnight and I was still far from it....
I started to clean the sump equipment, or in other words did the tank's "yearly maintenance cleanup" which in a marine aquarium means only to clean the pumps and other equipments. No cleaning is done in the display tank, no gravel or sand or rocks are touched, and you only do this once per year.
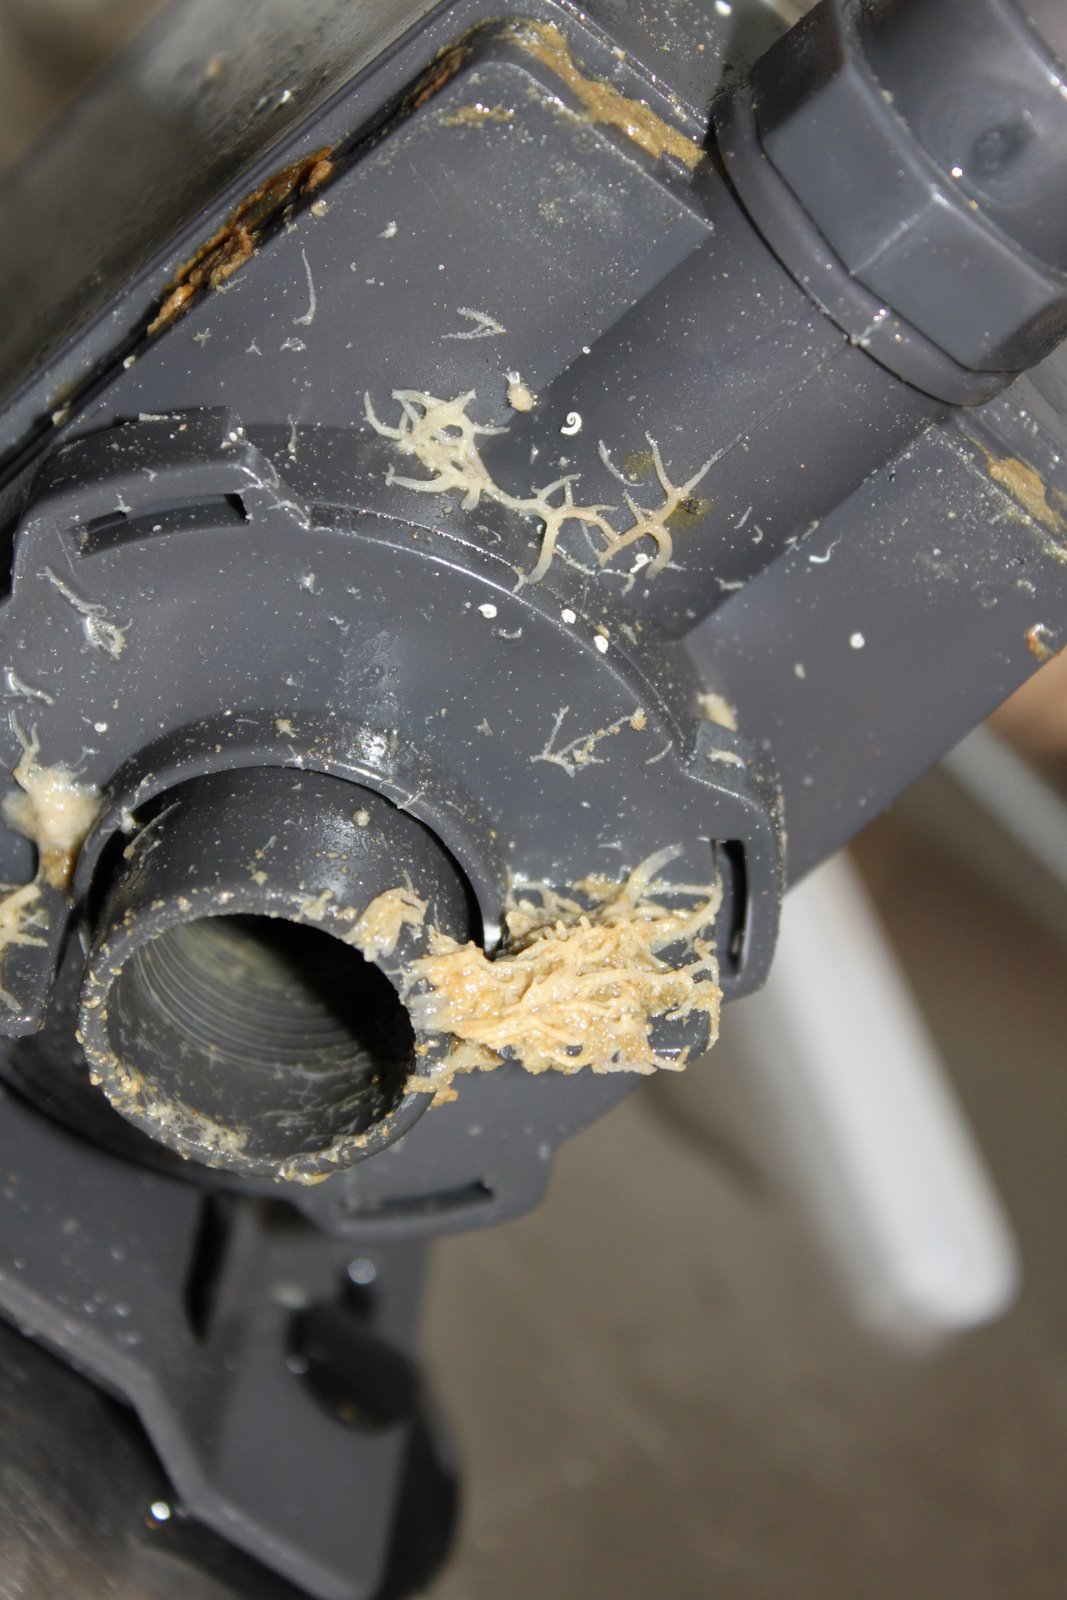
Check out how dirty the return pumps were.... there was a greasy yellow goo on almost everything and a little of sponge growth in some parts (if you click on the pictures you'll get a close-up view):


After disassembling everything, scrubbing everything with a hard toothbrush plus water and reassembling again, the return pumps were installed and plumbed into the new sump. Almost ready to turn the tank on again. It was 0:24 when I took the picture below:

I was not sure if I would clean the skimmer or not, but since it was very late, it was very dirty and I wasn't quite sure how to reach the parts I had to clean inside it, I decided to leave that for tomorrow or after. This is how dirty it was (remember, one year operating without cleaning the body... probably I should clean the skimmer more frequently than once a year....):


I left the new artificial rocks I bought for the refugium in old saltwater:

Then brought new saltwater from my mixing vat to the aquarium (using my plastic jerricans and dolly of course, no heavy weigh lifting here :-) ), filled up the sump, ensured temperature was compatible with tank temperature (that took about 30 minutes.... I had to cool down the water, it was at 28C and should have been at 26C) then turned the pumps on again, in practice putting the tank into partial operational mode. No ATO, no skimmer, cabinet door open all night because there was no ventilation installed, refugium still empty, but, it was already 2:25 when the picture below was taken. I still had to mix new saltwater (to be used the next day) and ended up going to bed around 3:15, very tired but satisfied for the work done.

The next day the saga continued, with skimmer cleaning. Using three different cleaning devices, a medium straight bristle brush, a long "toothbrush" and a toilet cleaning brush (all dedicated to aquarium use) I was able to clean the skimmer body fairly well, but that was a lot of work. Installed it back into the new sump, see the difference:

Then, as I cleaned the water level sensors of the ATO system I accidentally broke a retaining ring that ensures the floater doesn't fall off when water levels go down..... what a bummer.... I was very upset for a few minutes, as I had no replacement part...

Then as adrenaline went down and calm returned, praise the Lord, I figured out I could jerry rig it using 1/4 inch plastic hose:


ATO sensors OK, it was time to build my "plastic jerrican cartridge" based ATO. Here is the core of the system, a small top off pump with hose and power cable passing through a jerrican cap. The cap was drilled for the hose to pass, and cut radially to permit the cable to be inserted into the cap without having to cut or mend it:

My ATO water "cartridge

Then I unscrewed the cap used to transport the jerrican, inserted the pump pictured above into it, screwed the drilled cap in place and voilá, the ATO system was operational:

That was the end of day 2. On the next day,with help from my kid, we brought new saltwater from the mixing vat, put sand, rocks and water in the refugium and prepared it to go operational. In the picture below it is just filled but doesn't have water flow going through it yet. About 22L of water in there.

I also brought a rock from the display tank into the refugium, to seed it with pods and other tiny creatures that I know exist in the main tank in the live rock. From the tank:

Into the refugium, after being cleaned of Valonias and Green Hair Algae:

And a new, compatible in size, artificial rock was put in its place in the display tank:

To make the refugium water feed circuit I used gardening sprinkler valves I bought at Leroy Merlin (I wanted to be able to control the water flow):

Here is what the finished circuit looks like, there is valve to control flow and a T at the end to ensure no flow is pointed directly at the sand:


Next step install the light socket for the refugium's light:

And then I finished the side cabinet, drilling a side hole for power cords to come into it, closing the air passage into the sump cabinet (the vertical beige strip covers it), installing power strips, installing the ventilation fan (green guy, upper left) and fixing the side cabinet to the main cabinet with a bracket.

Closeup of power strips, one is for regular 120V power, another for 12V fans and a timed one for refugium lighting:

Day 3, job done, here is the full tank shot of the finished product:

Now I only need my BFG9000, which is ready and should be delivered soon }:-) .....
Snorkeler
Subscribe to:
Comments (Atom)