I just took vacations, and I used some of those days to do my tank's yearly maintenance plus upgrade the sump and install my new side cabinet where my new ATO, water change and special equipment would be housed.
Here's the story, with pictures. If took about 3 days, the first day was veeeery long, on the other two I spent just a few hours in each.
Some background first....
I like very much the LFS where I bought my tank, Solar Reefs (I'll call them LFS1 from now on), I think the owner and his assistant are very knowledgeable in marine aquarium biology, fish keeping, coral keeping, products and they have a natural/biological approach to husbandry trying to avoid too much equipment and gizmos. I definitely like that. In general I always trust their advice and I buy fish and corals only from them because their stuff is properly quarantined. Their store tanks are beautiful and you can sense their care with the livestock when you are there.
But, they are not engineers, and that gradually became evident in the ventilation and noise design flaws of my tank. In terms of noise they used fans that vibrated too much, and the cabinet transmits too much vibration to the floor (bothering my neighbor below until I changed fans and skimmer pump impeller). As time passed I discovered the hood and the sump cabinet didn't have good ventilation. On the hood there were two fans designed to come on when temperature went above 27.5C, but, there were only two holes in the hood, each with a fan and both fans pulled air into the hood. The result, weak cooling. I had to fix that in January 2010, removing one of the fans and installing a silent computer cooler fan on top of the hole where the other fan was. So one hole is where air is pushed in by the cooler, eventually distributed inside by one of the old fans, and the other hole is empty so the hot air can escape through there. In the sump cabinet there was another fan that in theory pushed air to the outside of the cabinet. The problems there was that it was noisy and that it was always pulling moist air(it was inside the sump cabinet, after all), so salt gradually built up on its blades and body. I designed the new cabinet and ventilation to fix that, as you'll see in the pictures.
I decided to test a second LFS for the new sump construction and delivery (I'll call them LFS2, they are Onda Aquários), they are much closer to my house than LFS1, have a good reputation too specially with Mathias a Brazilian aquarist I admire, but they don't seem as knowledgeable as LFS1. For sump construction, fine, but for fish, coral, livestock and food purchases I'll stick with LFS2 as I'm quite sure they are better.
End of the (long) introduction. Here come the pictures.
Story starts with the carpenters (LD Marcenaria, high quality, I definitely recommend them) delivering the new side cabinet. Here is a full tank shot of the original tank with the new cabinet positioned close to final installation location:

Here is another view of it open:

As you can see inside it I can house about three 22L plastic jerricans on the bottom plus other 10L jerricans on top or other bottles and stuff.
Here is the old sump before disassembly. This picture was taken at 14:00 and when I started disassembling the stuff the new sump hadn't arrived yet. It was promised for 17:30, so there was enough time.

It was quite dirty inside.... never cleaned in a year....
So I drained the sump's water, removed all the equipment from the sump and placed them in a box with old saltwater:

Here is the old sump drained and empty of equipment and plumbing. This was 18:30 and LFS2 had not delivered the new sump yet. Not good....

More stuff removed from the old sump:

And here are two pictures of the fan (a computer cooler, as I removed the original fan in January because it was too noisy) that was inside the cabinet. Notice the salt plus debris buildup on it... an ugly grey thing I'll call "dustsalt"...


LFS2 called around 18:45 telling me the new sump would be delivered around 20:00... ok, delayed but not forgotten.
But, at 20:30 no sign of the new sump.... and as I called LFS2 nobody answered (they closed at 20:00). Then I got worried.... I knew I wouldn't be in too much trouble if I had to spend the night sump-less because of my MP10 pump in the display tank which would keep the water moving and oxygenated. But, it wasn't a very comfortable situation...
At 21:15 roughly the sump arrived, but it was being delivered by two aquarists who "were doing a favor to Onda"... seems like they just happened to pass at the store and were recruited to deliver the sump. Not good. When I bought it it was very clear that they would deliver the sump to me. Yep, LFS2 didn't pass the customer service or reliability test... what if these guys had damaged the sump during transportation? Will only use them for stuff I'm in haste of getting, due to their greater proximity to my house.
Here is the new sump, being tested with freshwater for leaks. No leaks, sump OK, ready to start installation. This was around 22:00:

Here is a picture of the new hole on the sump cabinet side, where the new ventilation fan is going to be installed. I "painted" it with silicone to avoid moisture problems in the cabinet walls. This new fan will blow air into the sump cabinet, drawing it from the side cabinet where air is still dry. Therefore there should be no "dustsalt" buildup on it, only maybe dust buildup.

And here is the Ching-Ling cooler fan I use. I chose it because it is silent, really silent, with good air flow (12cm diameter). The only inconvenience is that it's 12V DCC.

Here is a picture of the sump cabinet empty and clean. It was quite dirty with "dustsalt" and just salt inside. It was 23:00 when I took this picture.

A view of the sump cabinet ceiling, where the plumbing that communicates to the tank is. The central tube is the main tube connecting the central overflow box to the sump (it is how water comes down from the display tank to the sump). The tube with a small horizontal piece is the second tube that comes from the overflow box, there are two to avoid problems with accidental clogging. The other two smaller tubes to the left and right are the return tubes, through them we pump water from the sump back into the display tank. I have two of them (and two pumps) for safety reasons too, so if one breaks down the other keeps the water flowing between display tank and sump. One of the return pumps is connected to a UPS/No-break power source (saved me when we had a 5 hour blackout earlier in the year).

Finally the new sump being moved into position to be inserted into the cabinet, on my home made dolly:

Then, the new sump in the cabinet. It looks like the old one, but it is 10cm deeper and the right compartment is a refugium, not the ATO freshwater reservoir as in the old sump:

It was 23:20 when the picture above was taken. Now I still had to clean the pumps and plumbing and re-install it all back into the new sump, bring new saltwater and get the tank operational again. I was expecting to be in that situation around midnight. It was 40 to midnight and I was still far from it....
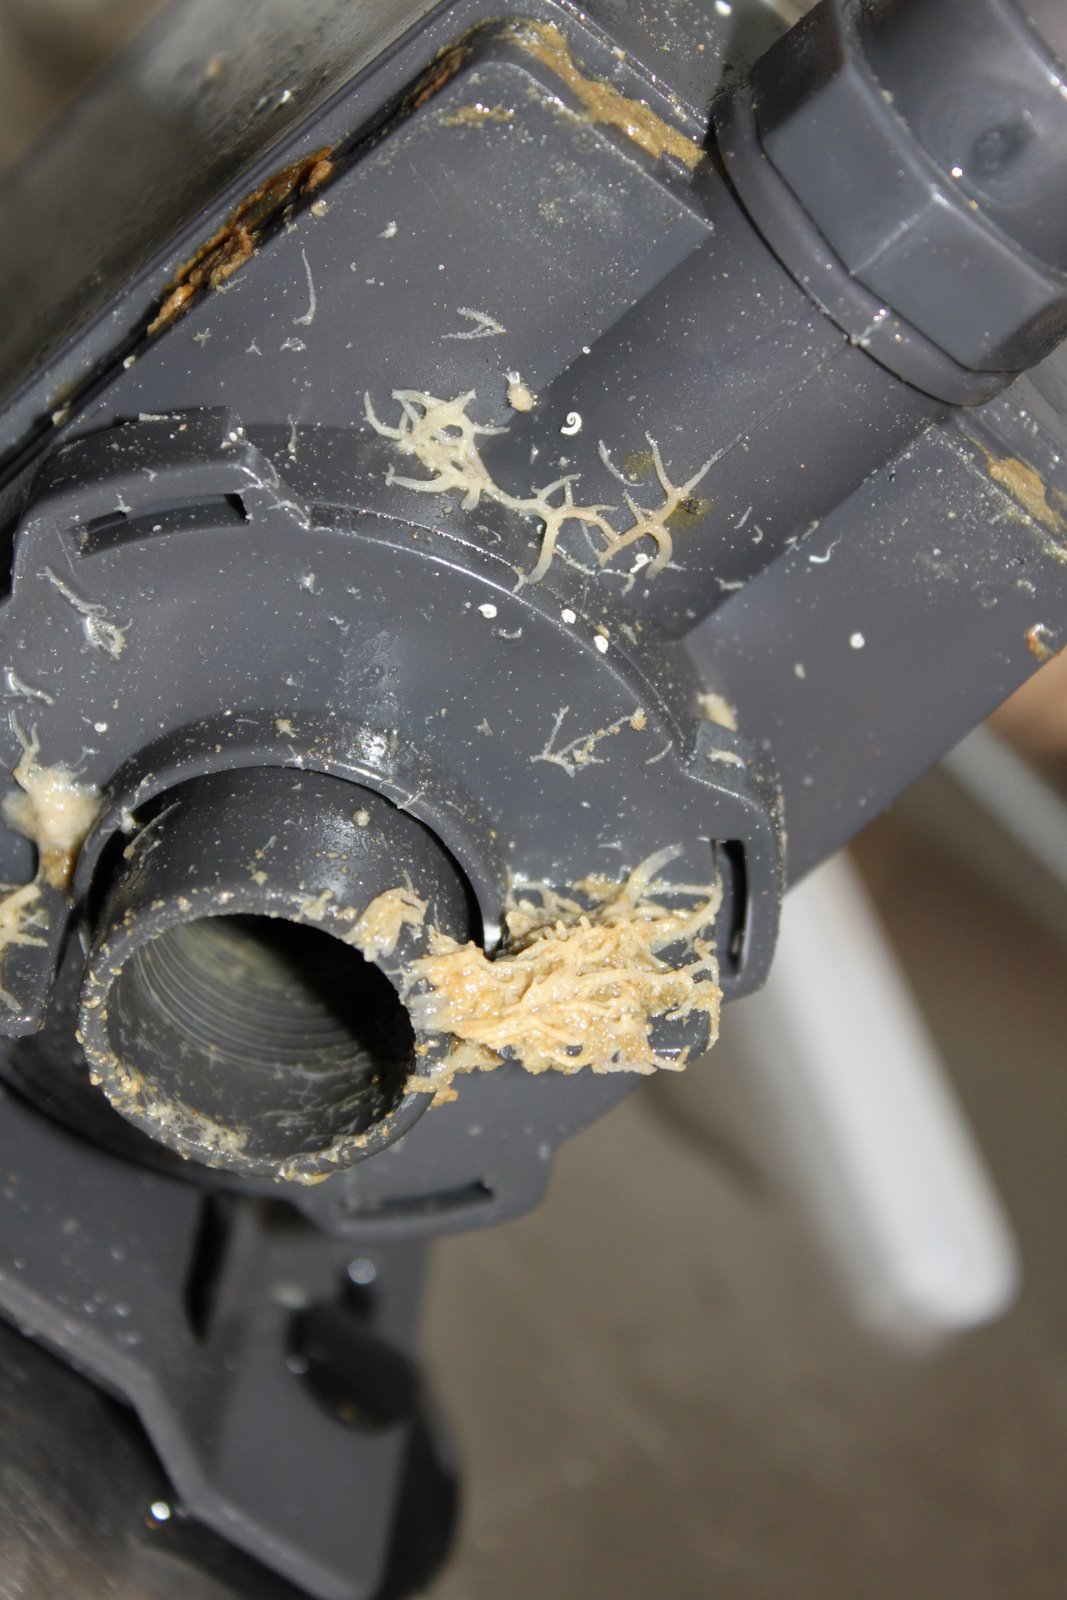
I started to clean the sump equipment, or in other words did the tank's "yearly maintenance cleanup" which in a marine aquarium means only to clean the pumps and other equipments. No cleaning is done in the display tank, no gravel or sand or rocks are touched, and you only do this once per year.
Check out how dirty the return pumps were.... there was a greasy yellow goo on almost everything and a little of sponge growth in some parts (if you click on the pictures you'll get a close-up view):


After disassembling everything, scrubbing everything with a hard toothbrush plus water and reassembling again, the return pumps were installed and plumbed into the new sump. Almost ready to turn the tank on again. It was 0:24 when I took the picture below:

I was not sure if I would clean the skimmer or not, but since it was very late, it was very dirty and I wasn't quite sure how to reach the parts I had to clean inside it, I decided to leave that for tomorrow or after. This is how dirty it was (remember, one year operating without cleaning the body... probably I should clean the skimmer more frequently than once a year....):


I left the new artificial rocks I bought for the refugium in old saltwater:

Then brought new saltwater from my mixing vat to the aquarium (using my plastic jerricans and dolly of course, no heavy weigh lifting here :-) ), filled up the sump, ensured temperature was compatible with tank temperature (that took about 30 minutes.... I had to cool down the water, it was at 28C and should have been at 26C) then turned the pumps on again, in practice putting the tank into partial operational mode. No ATO, no skimmer, cabinet door open all night because there was no ventilation installed, refugium still empty, but, it was already 2:25 when the picture below was taken. I still had to mix new saltwater (to be used the next day) and ended up going to bed around 3:15, very tired but satisfied for the work done.

The next day the saga continued, with skimmer cleaning. Using three different cleaning devices, a medium straight bristle brush, a long "toothbrush" and a toilet cleaning brush (all dedicated to aquarium use) I was able to clean the skimmer body fairly well, but that was a lot of work. Installed it back into the new sump, see the difference:

Then, as I cleaned the water level sensors of the ATO system I accidentally broke a retaining ring that ensures the floater doesn't fall off when water levels go down..... what a bummer.... I was very upset for a few minutes, as I had no replacement part...

Then as adrenaline went down and calm returned, praise the Lord, I figured out I could jerry rig it using 1/4 inch plastic hose:


ATO sensors OK, it was time to build my "plastic jerrican cartridge" based ATO. Here is the core of the system, a small top off pump with hose and power cable passing through a jerrican cap. The cap was drilled for the hose to pass, and cut radially to permit the cable to be inserted into the cap without having to cut or mend it:

My ATO water "cartridge

Then I unscrewed the cap used to transport the jerrican, inserted the pump pictured above into it, screwed the drilled cap in place and voilá, the ATO system was operational:

That was the end of day 2. On the next day,with help from my kid, we brought new saltwater from the mixing vat, put sand, rocks and water in the refugium and prepared it to go operational. In the picture below it is just filled but doesn't have water flow going through it yet. About 22L of water in there.

I also brought a rock from the display tank into the refugium, to seed it with pods and other tiny creatures that I know exist in the main tank in the live rock. From the tank:

Into the refugium, after being cleaned of Valonias and Green Hair Algae:

And a new, compatible in size, artificial rock was put in its place in the display tank:

To make the refugium water feed circuit I used gardening sprinkler valves I bought at Leroy Merlin (I wanted to be able to control the water flow):

Here is what the finished circuit looks like, there is valve to control flow and a T at the end to ensure no flow is pointed directly at the sand:


Next step install the light socket for the refugium's light:

And then I finished the side cabinet, drilling a side hole for power cords to come into it, closing the air passage into the sump cabinet (the vertical beige strip covers it), installing power strips, installing the ventilation fan (green guy, upper left) and fixing the side cabinet to the main cabinet with a bracket.

Closeup of power strips, one is for regular 120V power, another for 12V fans and a timed one for refugium lighting:

Day 3, job done, here is the full tank shot of the finished product:

Now I only need my BFG9000, which is ready and should be delivered soon }:-) .....
Snorkeler
Wow! What a workout! Congrats on the new configuration. Looks GREAT and very promising :-)
ReplyDeleteJust a small suggestion: change those hinges (or at least the screws) every so often because after a couple of years, you won't be able to remove those screws. The head of the screw will desintegrate and you'll have to drill through them to put new hinges (when the ones you have now stops working). I had this problem before. It would have been much much easier if I had just changed the screws every year.......